

Even with all the social platforms that have popped up over the last decade, email newsletters are still the best way to communicate with your audience in 2026.
This for a few key reasons:
Newsletters have actually seen a major resurgence over the past couple of years.
Companies like Substack have come along and made it super easy for anyone get started.
They let you build landing pages, create paid subscriptions, and publish your newsletters all with a couple of clicks.
But while a services like Substack are great, they’re not for everyone.
For one, they take 10% of your revenue(!) if you run a paid newsletter.
Second, because they’re designed to be so simple, you lose a lot of the advanced functionality that comes with using a more traditional email service provider like ActiveCampaign or Moosend.
And lastly, if you already run a website built on WordPress, it’s not going to do much to help your SEO.
Substack is not the best option if your website runs on WordPress.
Important Note: I personally use Newsletter Glue, and this review is in no way sponsored or paid for by the product creator. Some links may be affiliate links, should you want to buy the product. There’s no extra cost for you – it’s just a little way you can help support us. You can read about our affiliate promise here.
📰 The Old Way of Sending Newsletters
So we’ve determined that using an email service provider (ESP) like ActiveCampaign or Moosend is a much better option for WordPress site owners.
But the process is a little disjointed.
Most people build their opt-in pages on WordPress, use their form plugin to integrate with their ESP, and then send their newsletter directly from the ESP.
While this is straight-forward enough, you’re missing out on one key benefit: your content is not evergreen.
All the effort you’ve put into your newsletter lands in your subscriber’s inbox, and then is never to be seen again.
Sure most ESPs offer a campaign archive page hosted on their own subdomain, but you don’t get any SEO benefit from those.
To help build your site’s traffic & authority with Google, it’s a smart idea to publish your newsletters on your WordPress site like you would a blog post.
That way your newsletter will help your site rank for new keywords, build backlinks, and generate organic traffic.
But that’s where we run into our next problem.
Now we’re doubling up our efforts.
We can write the newsletter in WordPress and copy it to our email service provider after, or do it the other way around.
It’s not as simple as copy/paste though, because you’ll run into formatting issues, you’ll need to manually import all your images, and any content change you make you’ll need to make twice.
From my experience, this can easily add 1-2 hours to the time needed to send each newsletter.
If you send a campaign every week, that’s 4-8 hours a month you could’ve used to build your audience. Down the drain.
The good news?
There’s a new plugin I’ve been using called Newsletter Glue, and it completely solves this issue.
In this article, I’m going to review Newsletter Glue’s features, how it works, how it compares to other newsletter solutions, and whether I’d recommend it.
Let’s dive right in!
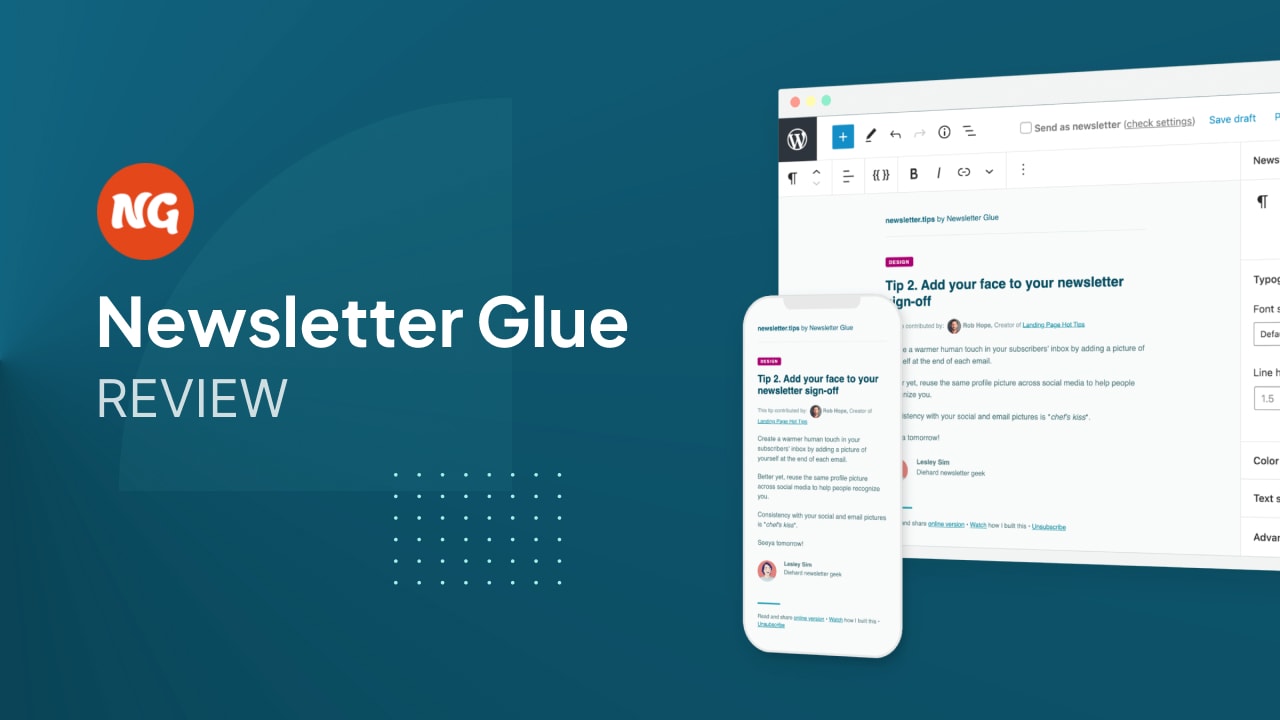
📨 What is Newsletter Glue?
Newsletter Glue is a plugin that lets you send your newsletters directly from WordPress.
You write your newsletter using WordPress Block Editor (aka Gutenberg).
Once you hit publish, it posts the newsletter on your website AND sends the newsletter through your ESP at the same time.
That’s the magic sauce right there.
It integrates with email service providers like ActiveCampaign, Moosend, MailChimp, Klaviyo, Campaign Monitor, Sendinblue and more (ConvertKit is coming soon).
Since Newsletter Glue integrates with the ESP you’re already using, you don’t need to worry about changing platforms, sending emails from your server, importing contacts etc.
🧑💻 Who is Newsletter Glue for?
Newsletter Glue is for bloggers and newsletter writers.
I’ve made a simple checklist of who I think could benefit from Newsletter Glue the most:
If you answered “yes” to all four of those bullet points, you should definitely keep reading.
Newsletter Glue will make your life a lot easier.
(P.S. if you’re just starting your newsletter, Newsletter Glue makes for a great foundation!)
🧱 How to Set It Up
On-boarding
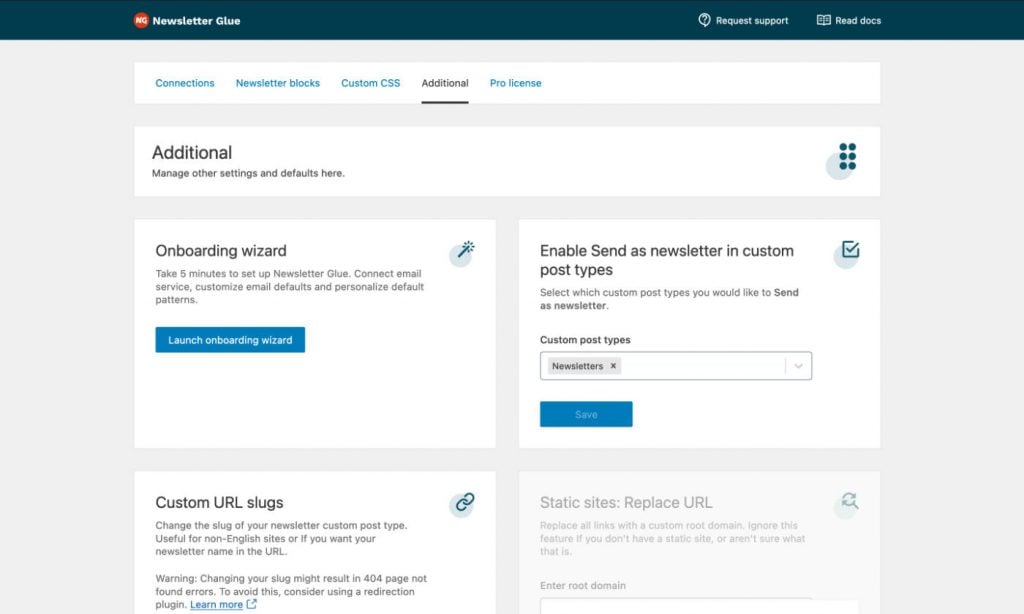
The first time you download and install the Newsletter Glue plugin, you’ll get taken to an on-boarding wizard.
After entering in your license key, you can connect to your email service provider:
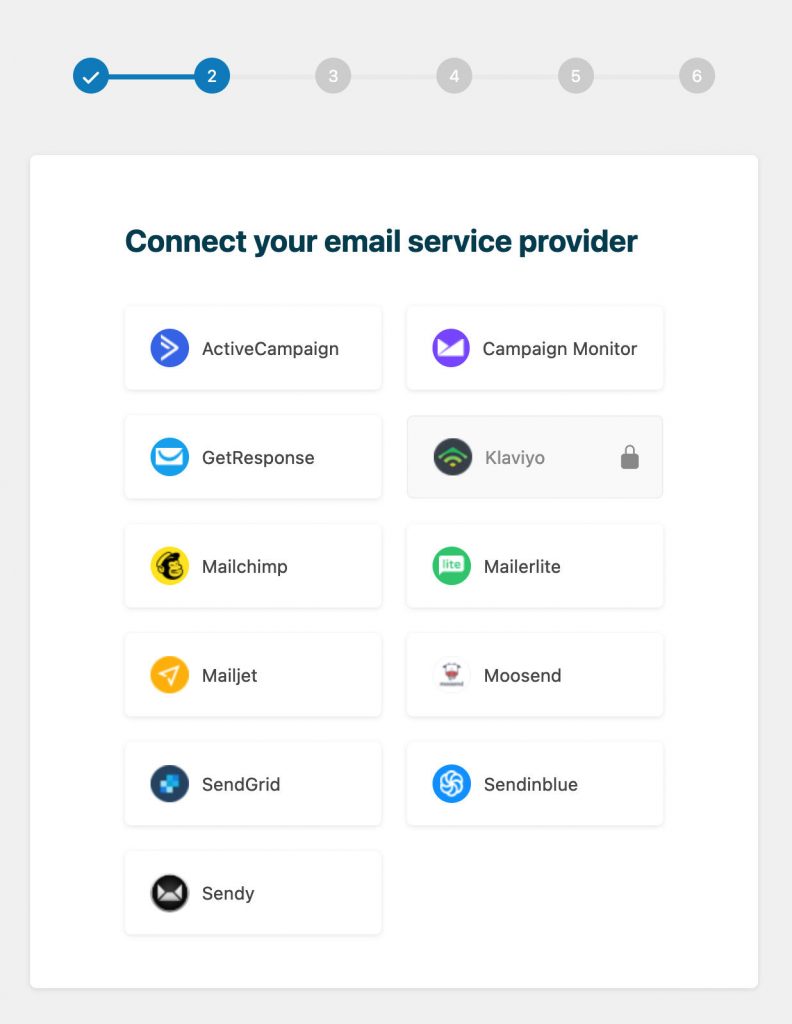
(If you’re not already using one, ActiveCampaign is a popular option. If you need something more budget-friendly, Moosend is also worth a look).
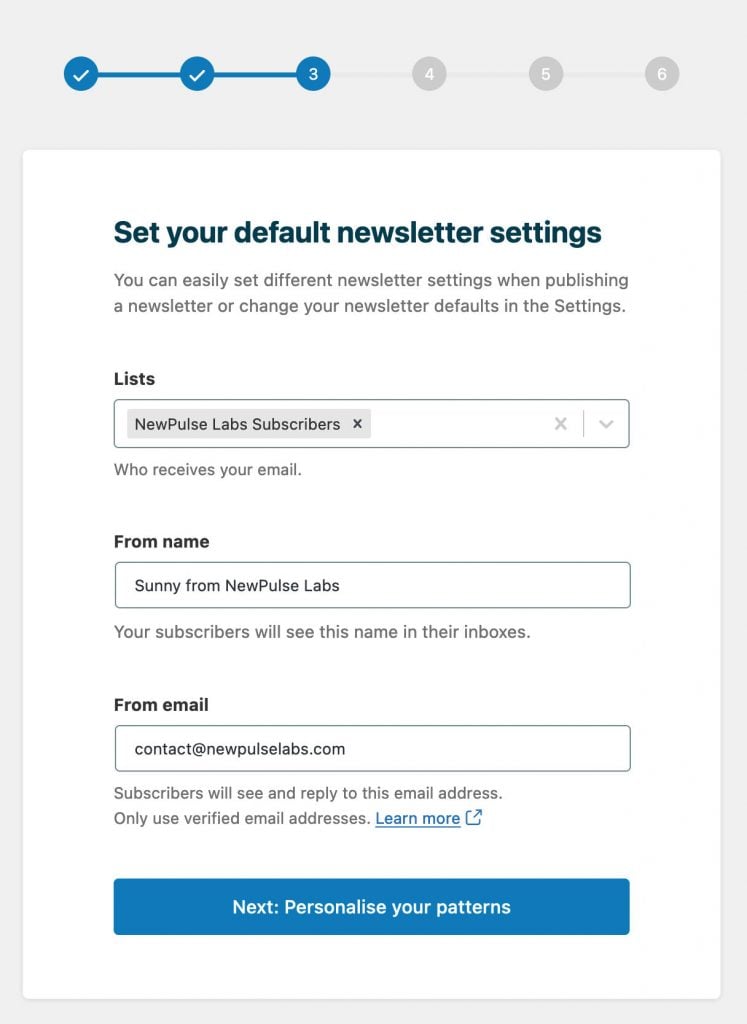
Once you’ve entered in your API key, you set the defaults for your email campaigns:
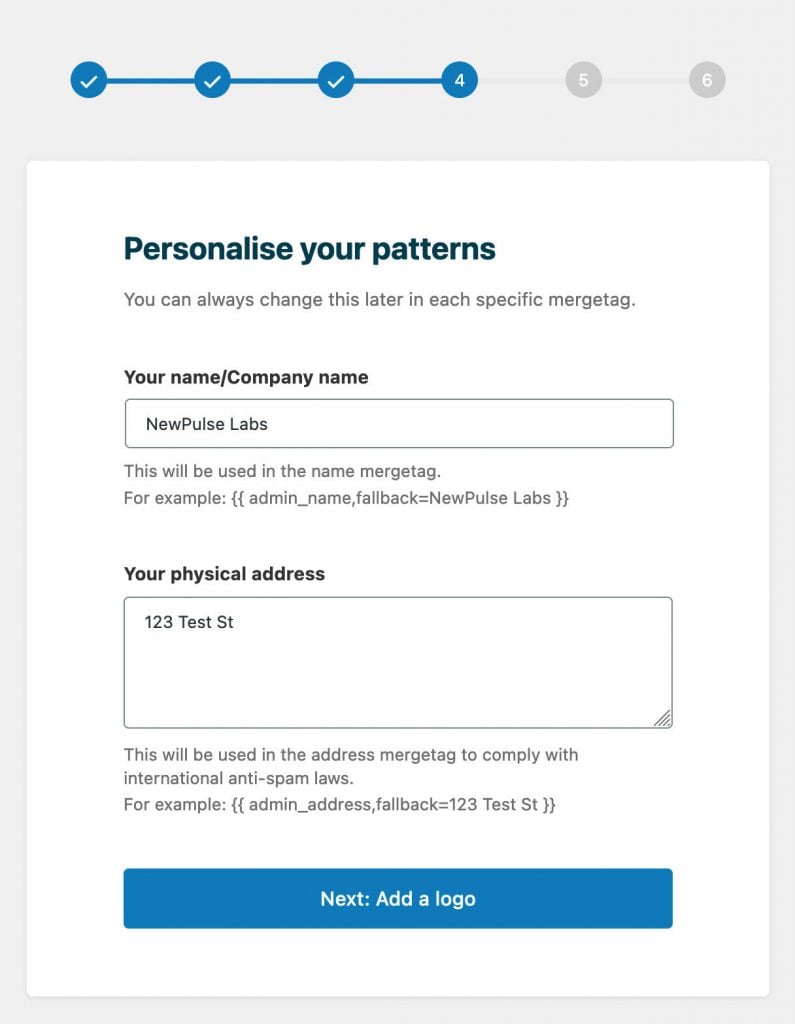
Add your logo:
Your social accounts:
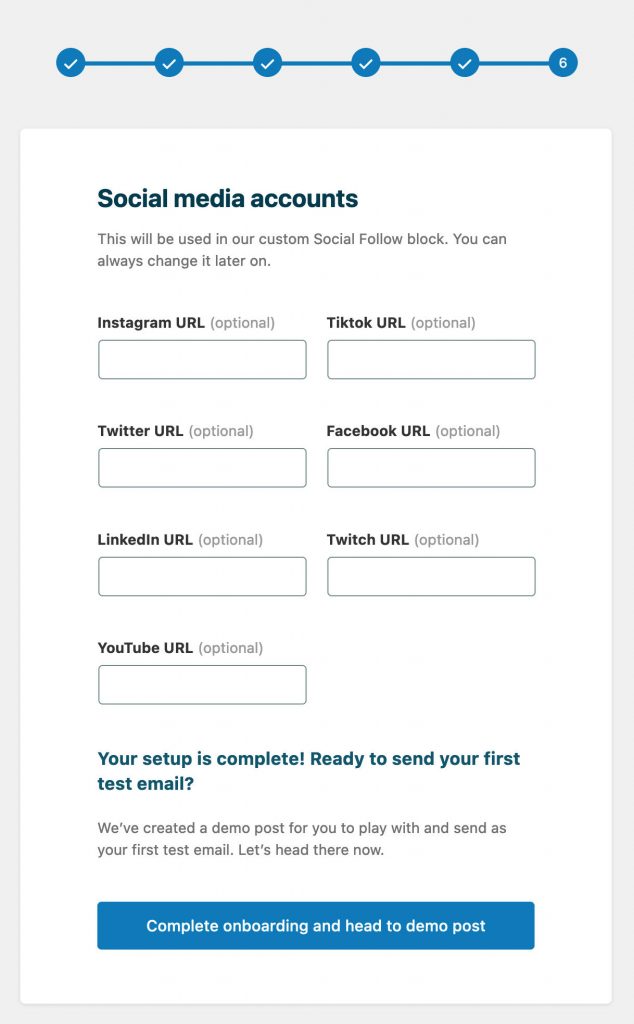
And you’re done!
Advanced Settings
The main settings page allows you to modify your ESP connection, enable/disable blocks (more on this in a second), add custom CSS, choose which post types you want to enable Newsletter Glue on, set user permissions and more.
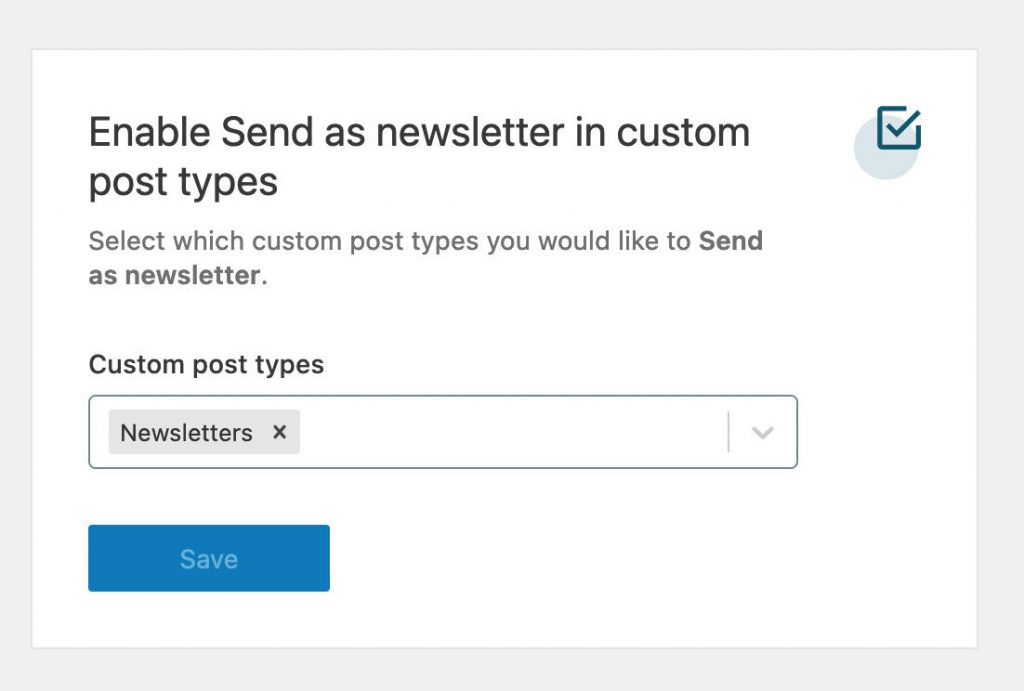
Choosing a Post Type
There are a few ways you can publish newsletters on your WordPress site.
You can add them as default WordPress posts, but I’m not a huge fan of this method.
Since my newsletters serve a different purpose than my blog posts, I prefer to keep them separated.
The best option is to use a custom post type.
Newsletter Glue actually already comes with a built-in custom post type, so you don’t need to do any of the setup.
If you’d rather create your own, CPTUI makes the setup a lot faster.
From there, you’d want to make sure you have your custom post type selected:
🎨 Designing Your Newsletter Theme
After you’ve entered all your general settings, the next step is to get your newsletter looking the way you want it.
Newsletter Glue comes with a theme designer that gives you a decent amount of flexibility.
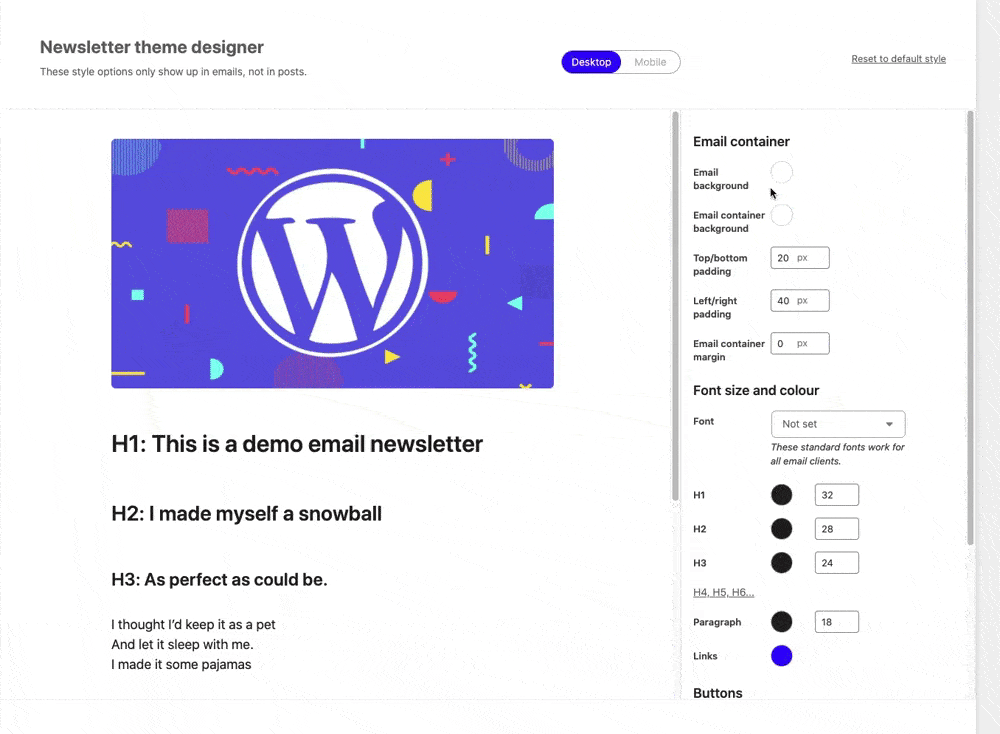
This is where you set your email background color, the container colour, and your container’s margins & padding.
It’s also where you choose your font, font sizes, link colors, and button styling.
You can also adjust your spacing and font sizes for mobile devices, which is really nice.
You’re not going to find a ton of styling options here, but from my experience, it had everything I needed.
Email clients don’t read styling the same way websites do, so it’s safer just to keep things simple.
🧩 Pre-Made Patterns
Newsletter Glue conveniently comes with a bunch of pre-made patterns that you can use within your newsletters.
Patterns are basically just a collection of individual blocks.
This lets you quickly add sections like this:
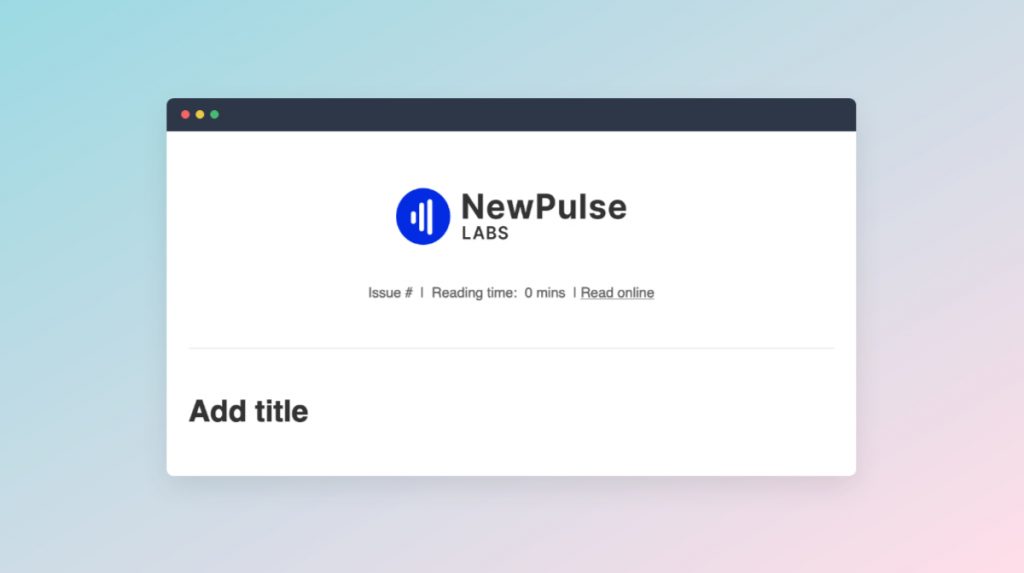
Which is a lot faster than designing it from scratch.
You can also build your own patterns which is really useful.
For The Lab Report, the patterns I made for myself are:
Any time I’m writing a newsletter, I can use those patterns to build my sections in just a few seconds. I love that!
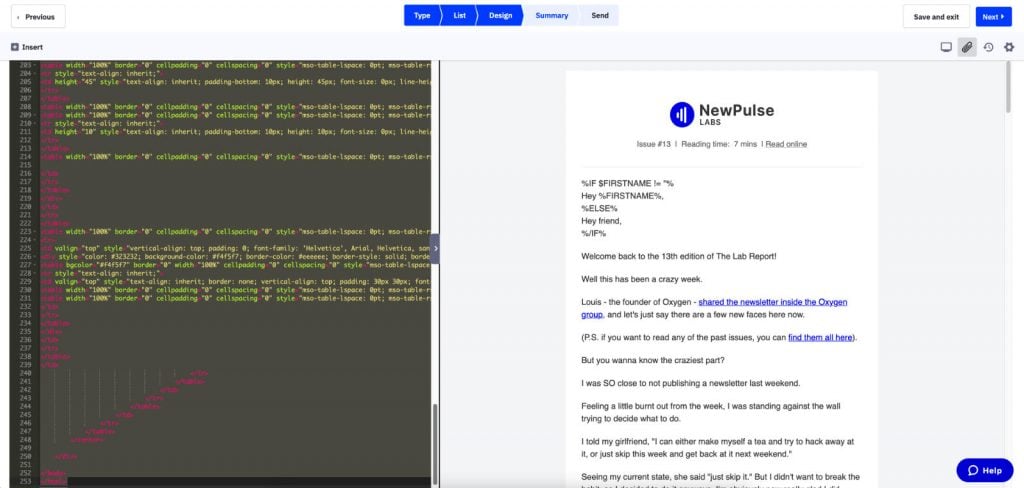
✍️ Writing Your Newsletter
If you’ve used the WordPress editor before (Gutenberg), you’re going to feel right at home.
Writing a newsletter with Newsletter Glue is exactly like writing a blog post, except that Newsletter Glue does all the magic behind the scenes to turn it into an email as well.
The easiest way to get started is to add one of the pre-made header patterns I mentioned above.
From there, you can add your content using the standard WordPress blocks.
To finish things off, you can add one of the pre-made footer patterns.
And you’re pretty much done!
How easy is that?
To preview what the email version of your newsletter is looking like, Newsletter Glue has a link to “Preview email in browser” in the meta box below your content.
Adding Custom Newsletter Blocks
Newsletter Glue comes with a bunch of useful blocks that you can enable/disable in the settings.
The blocks include:
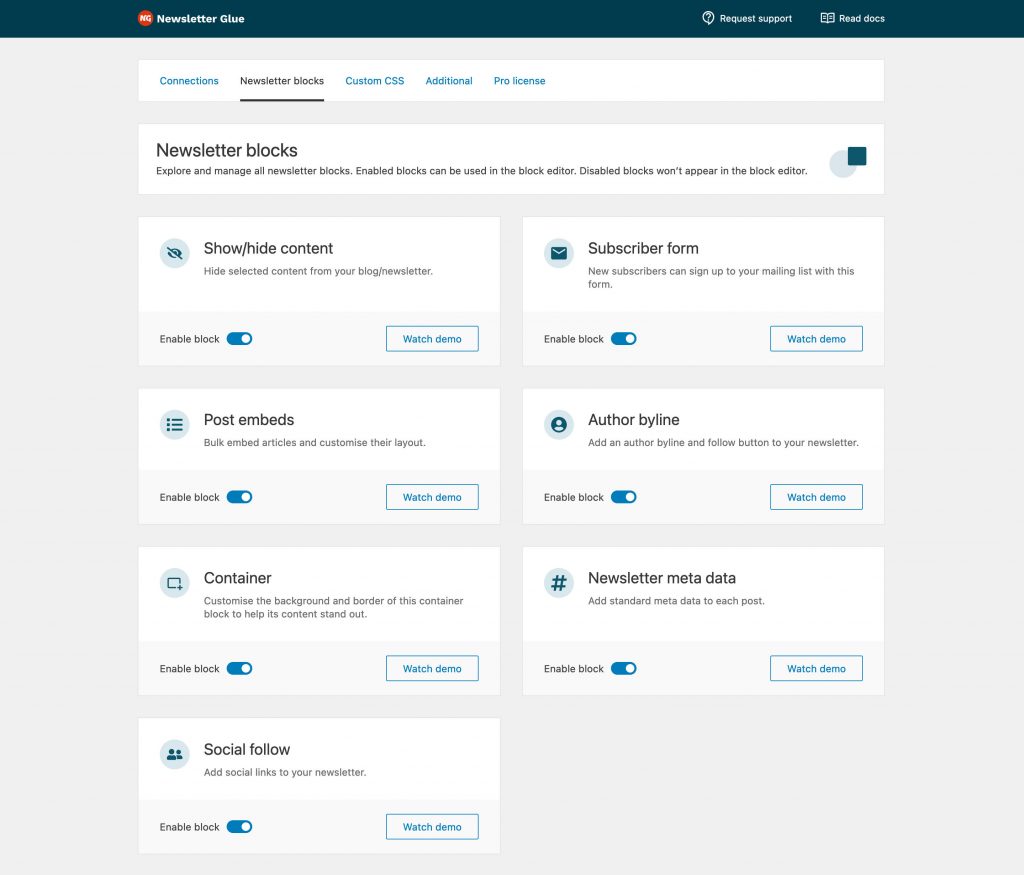
The Subscriber Form block let’s you add an opt-in form to any page, without needing to use any third-party form plugins.
Inside of newsletters, I use the Container block quite a bit.
It lets you add some additional styling, as well as choose whether that container gets shown on your newsletter or WordPress post (or both).
The Post Embed lets you quickly add a blog post to your newsletter – perfect if you’re doing a roundup of posts from the past week or month.
You can also use it to embed external content like tweets or YouTube videos.
The Meta Data block is really handy to use inside of your newsletter header. You can dynamically include info like the newsletter date, a link to the post on your website, the reading time and more.
Adding Your Newsletter Subject Line
In the meta box below the post, you’re also able set your subject line, preview text, ‘from’ name & email, and the list that you’re sending your email to.
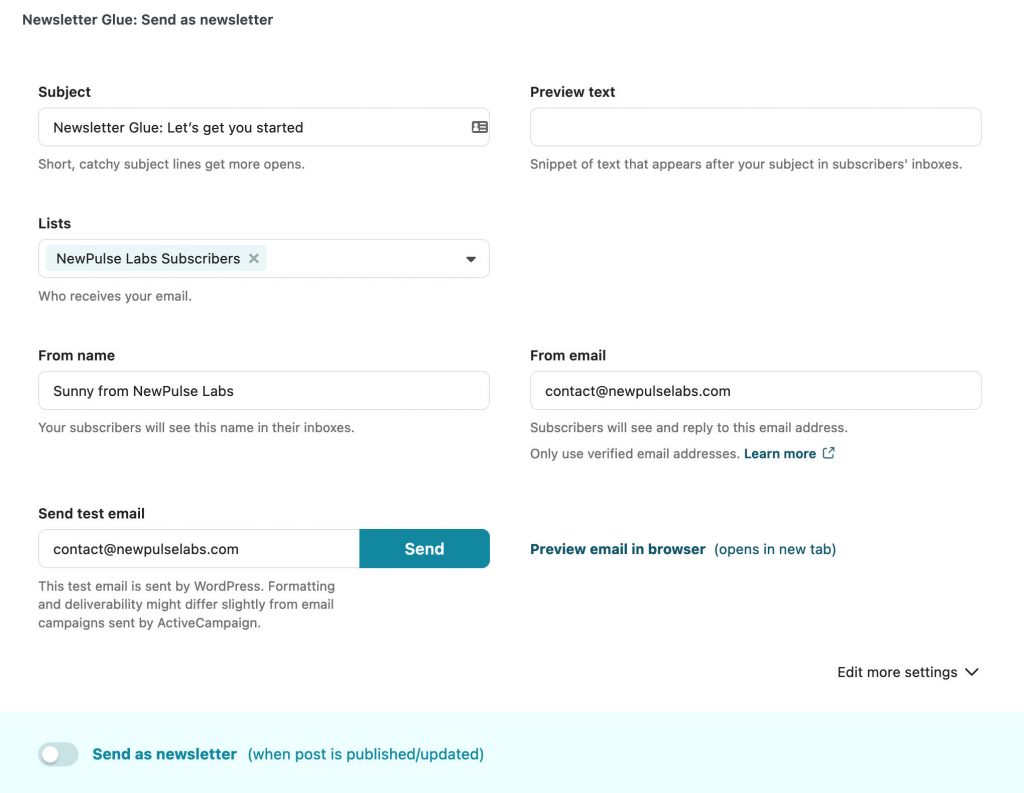
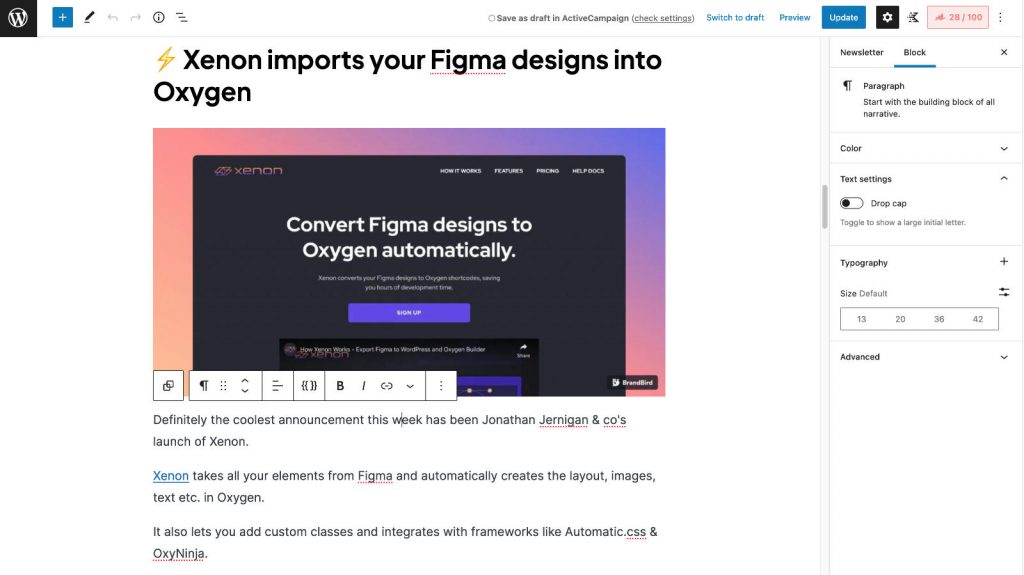
Publishing Your Newsletter
The last step before publishing your newsletter is choosing how you want to send it out.
You’ll see a toggle button in the meta box that says “Send as newsletter (when post is published/updated).”
If you turn this option on, Newsletter Glue is going to automatically send your newsletter out to your contact list once you hit Publish or Update in WordPress.
You don’t even need to log into your email service provider.
HOWEVER, if you’re anything like me, you probably look over your newsletter 3000 times before sending it out.
So rather than sending it out when I hit publish on the post, I like to click “Edit More Settings”, and select “Save as a Draft” instead of “Send Now”.
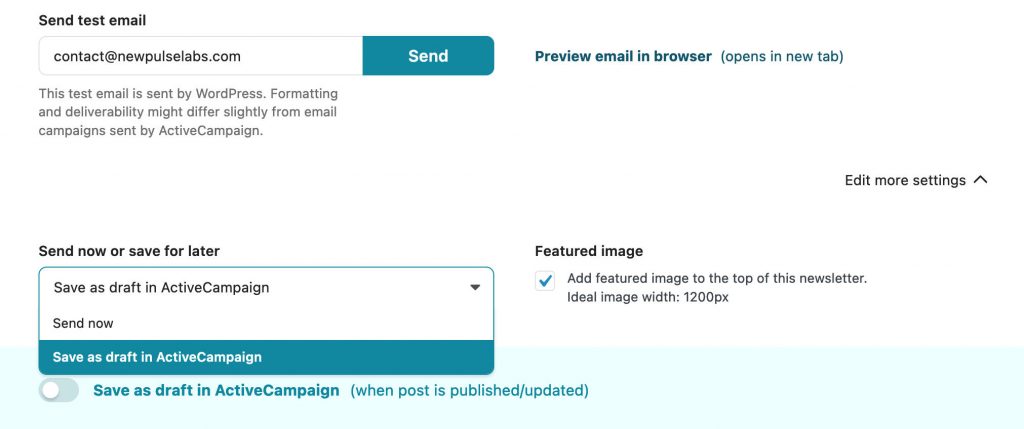
Now when I hit Publish on my WordPress post, it’s simply going to save the email as a draft in ActiveCampaign for me to perform all my OCD checks.
Previewing in Your ESP
I’m using ActiveCampaign for my newsletter, so that’s what you’ll see in the screenshots below.
If you’re using another platform it will obviously look different, but the process is the exact same.
In my campaigns list, I can see the draft that Newsletter Glue created.
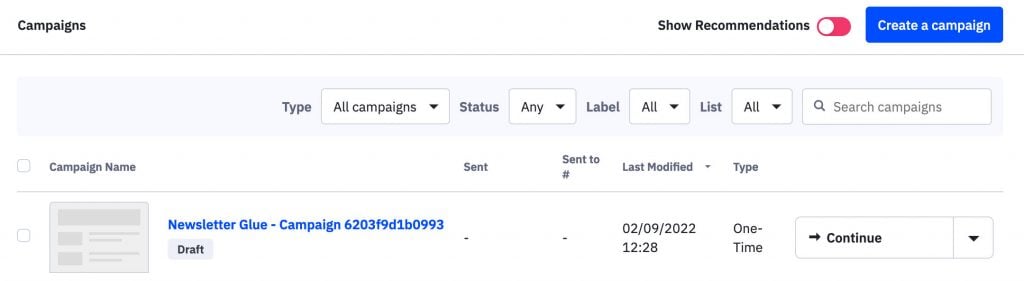
The template is created using HTML, so you won’t get your native editor features.
But if you need to edit a word or two, you can still easily change it in the HTML.
Send yourself a test email, double check all your settings, and you’re ready to send that bad boy out!
🌓 How does Newsletter Glue compare?
As of right now, there aren’t any competitors who do exactly what Newsletter Glue offers.
There’s Substack, but that means you need to change your email service provider and you don’t get any SEO benefits. Not a good option for WordPress.
Then there’s FluentCRM or GroundHogg, but that means you need to deal with the technical challenges of becoming your own email service provider (and of course, that means ditching your existing one).
Lastly there’s using your ESP the traditional way, but it requires you to manually add your newsletters to your WordPress site.
That option works, but it means losing 1-2 hours a week.
☎️ Support & Service
Since Newsletter Glue is a fairly new product, I have come across the occasional quirk here and there.
Nothing that’s impacted my newsletter (otherwise I wouldn’t be writing such a positive review), mostly just minor things that could be optimized in the UX.
I’ve reported anything I’ve come across to Lesley Sim – Newsletter Glue co-founder – and she’s been really fantastic to deal with.
She cares about your experience, and many of my ‘issues’ have been fixed in an update a few days later.
Newsletter Glue offers a 24hr Support Guarantee during the week – meaning you’ll get a response with a day or less. On the weekend, that bumps up to 48hrs.
💵 Pricing
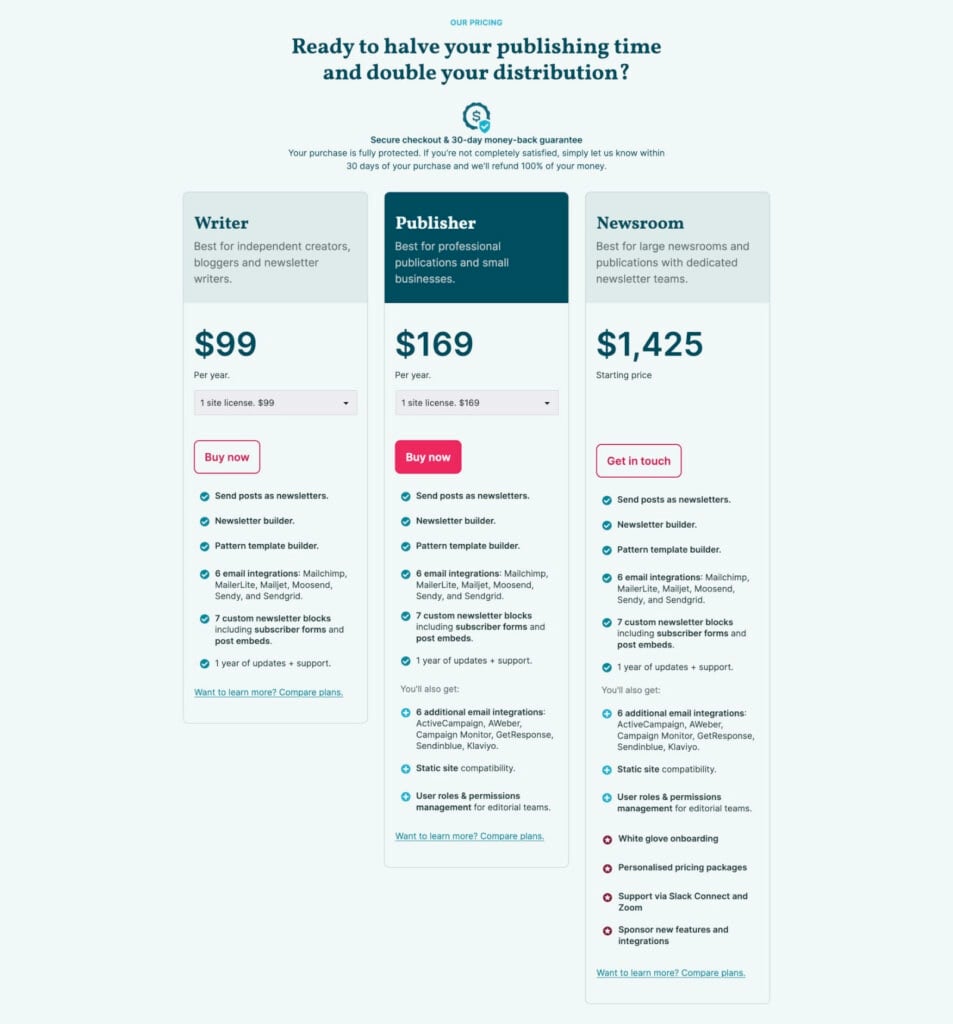
Newsletter Glue has three pricing tiers.
This covers a license for 1 site, but each plan offers a multi-site option if needed.
They offer a 30-day money back guarantee, so you can’t really go wrong if you decide it’s not for you.
Newsletter Glue Coupon Code
Lesley has kindly agreed to give the NewPulse Labs community a special Newsletter Glue discount code, where you can get 10% off your purchase 👀.
Just use this link and the coupon code will be automatically applied at checkout.
🔥 Do I Recommend Newsletter Glue?
I’ve been using Newsletter Glue for my newsletter since the beginning of 2022, and I would absolutely recommend it.
I used to send my newsletter through ActiveCampaign and then copy the content over to my site manually.
Since I don’t have to copy anything over now, I’ve easily saved 1-2 hours every single week.
It’s made the process of creating newsletter more enjoyable.
I get to spend more time writing good content, and less time dealing with formatting and importing images.
And it looks great. Here’s what my real life post and email look like:
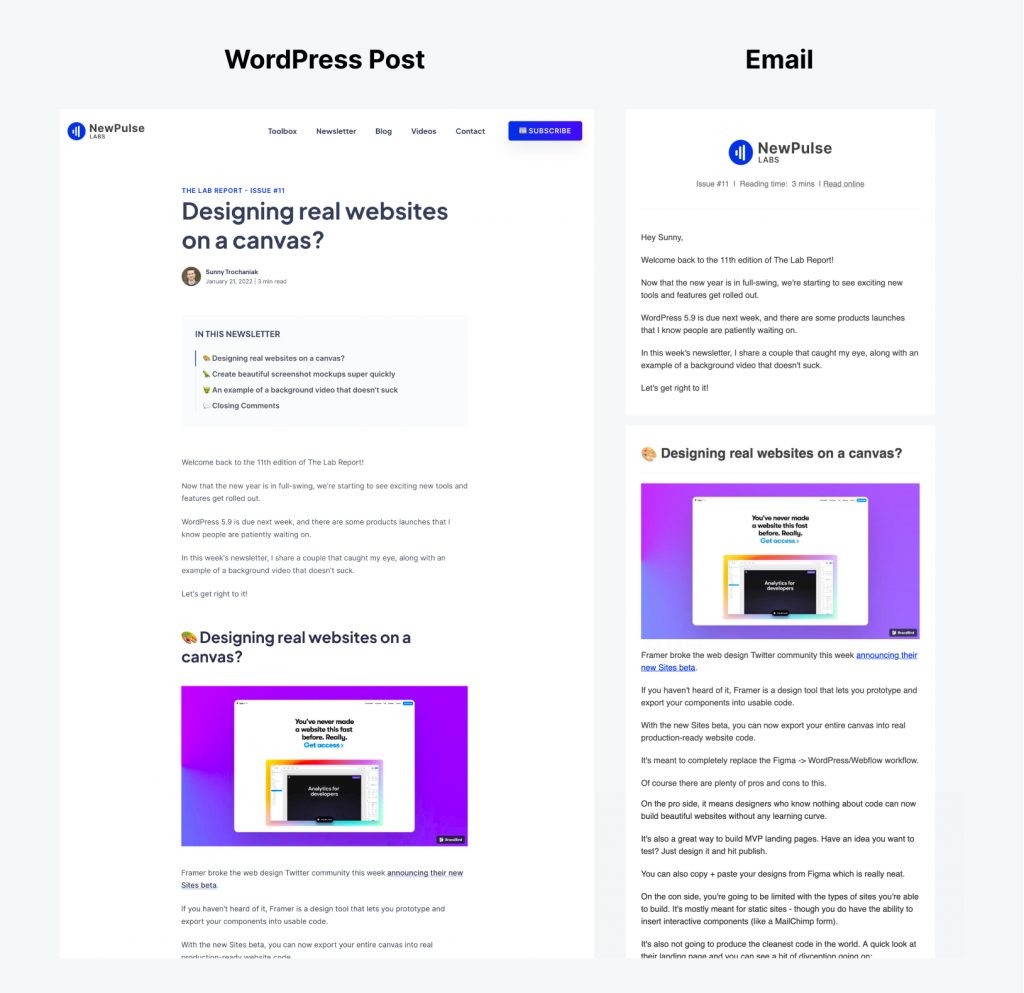
I love that I only needed to draft that newsletter once.
Overall, Newsletter Glue is a fantastic service for bloggers and newsletter writers.
It’s the best option for those looking for a Substack alternative for WordPress.
It saves you time and energy by automating the process of copying your content from WordPress into your ESP.
And if you weren’t already publishing your newsletter on your website, you’re now going to rank for more keywords, build more backlinks, and generate more organic traffic.
☁️ How to Download Newsletter Glue
You can pick up the latest version of Newsletter Glue here.
Using that link, you’ll also get a 10% discount automatically applied at checkout.
Grab Your Copy of Newsletter Glue
That’s all for this one.
Hopefully you found this Newsletter Glue review helpful, and be sure to let me know in the comment section below if you ever decide to try it out.
Thanks for reading!